Good scanning practices summarized:
- Always scan in RGB, never grayscale. There’s a lot of valuable data in those three (Red-Green-Blue) channels.
- Scan at the highest resolution.
(or 1/2 of your scanner’s optical resolution) to capture all the detail inherent in your original photograph and to allow lossless scaling. - Save your file in .psd, .tif or .jpeg file format:
- PSD & TIFF – native Photoshop file format (.psd) – or .tif files are highly RECOMMENDED. Both .psd and .tif files are uncompressed files proprietary to Photoshop and are much larger than .jpeg files. The file hosting service Dropbox offers convenient and fast uploading and sharing of your .psd and .tif file(s). Share the folder with paul@pbphotorestore.com
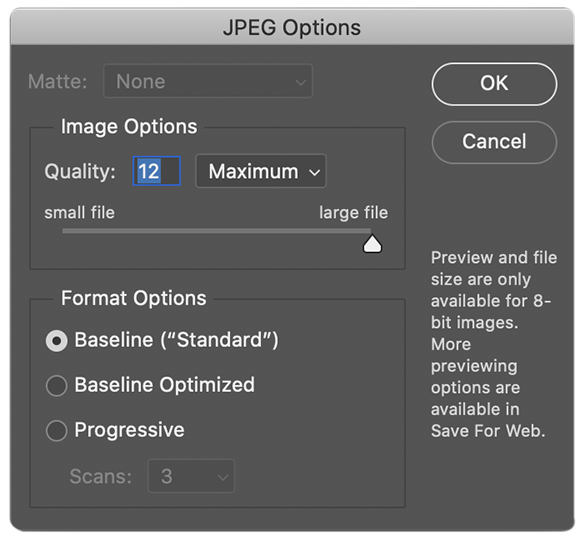
- JPEG, or .jpg is the most popular and compatible image file format available. It is the standard file format of nearly all modern consumer quality digital cameras and is supported by almost all imaging software. Unfortunately, the JPEG file format uses “lossy” compression, meaning that compromises are made to allow some image quality to be lost each time the image is compressed and saved. The JPEG file format is best used for creating compact files for uploading and viewing on the Internet or for e-mail attachments. If you must use the JPEG file format choose only Maximum Quality JPEG compression settings to insure that you are saving your image at the highest quality setting. The inset below shows the Photoshop JPEG dialog set to the highest quality JPEG setting. The JPEG file format is recommended if you are an average computer user because it is easier to work with, more compatible, and produces smaller and more manageable files. If a client chooses to make their own prints, they will usually receive a .jpeg file saved to Photoshop’s highest quality JPEG setting. These files will produce an acceptable quality print from any print vending service or your own printer.
High quality photo restoration requires a high quality scan
(A high quality scan also makes a huge difference.)
In this age of digital photography, scanners are still around largely because most of us — including our parents and grandparents — have boxes or albums full of old film-based photographs. Many times, collections have not been treated well, often stored in a shoe box under the bed or buried in a closet, attic or basement, unseen for years and mostly ignored. Most people would like to get those photos scanned, and for the ones that have deteriorated over time dues to poor storage conditions — dust and dirt, fading or darkening, cracks and tears, etc. — they would like to get them restored. Its a great way to preserve your family history. And, restored photographs make great gifts! Needless to say, a higher quality original image — sharp focus, detail intact, good contrast and color balance — will always produce a higher quality restoration than a photo lacking in any of these qualities. But the quality of the scan is critical also.
Before any digital restoration can be performed, the original photo needs to be scanned. This step is critical, since it ultimately determines your restoration’s potential. Needless to say, try and use the best scanning equipment and software at your disposal. Flatbed scanners provide much higher quality than sheetfed scanners. Scanning photographs takes some time and requires a bit of up-front technical knowledge, but its not really all that difficult if you follow a few simple rules. Almost anything that speeds up the scanning process (other than buying an expensive and faster scanner) lowers scan quality. Its important to note that the quality of the final photo restoration is completely predicated on the quality of the original scan. The industry saying is “garbage in garbage out” (GIGO), so take the time to learn the basics, and then accept the amount of work that comes with it.
Choosing the right scan resolution is important
The basic rule for resolution is simple: scan at a 1/2 or 1/4 multiple of your scanner’s optical resolution. So what does that mean? Even the most affordable consumer grade scanners offer remarkable scanning resolution. Most scanners can go beyond what is really needed, and large files are difficult to work with and store. A case in point is the Epson Perfection V500 Photo Scanner, available for less than $180 and boasting a whopping hardware resolution of 6400 x 9600 ppi*. When you check your manual for the hardware resolution specifications, its the FIRST number that matters, in this case 6400ppi, which is the Optical Resolution of your scanner. This very high resolution is unnecessary for a high-quality scan however, so divide it down until you’re in the range of 400 to 800 ppi. That resolution will be more than enough for almost all of your scanning needs and nothing higher than that will make any difference when you print to paper.
Two reasons when you need to scan at a higher resolution
Excluding scanning negatives or slides, there are times when scanning at a higher resolution might be necessary to maintain image quality and integrity:
- When you have a small original, say 2 x 3 inches or so that you want to enlarge to 5 x 7 or (I do not recommend scaling a small image any higher than 5 x 7 or slightly larger).
- When you want to crop a section from your original image to create a new composition that will be made into a much larger image.
In these cases, scanning your original, or the section of the original that you want to crop, it would be best to scan at a higher resolution. Using the Epson V500 again as an example, choosing 1600ppi (1/4 optical resolution) would be more than enough to get the job done. When scanning photos, its better to err on more resolution than less.
*PPI means PIXELS PER INCH and you should always use ppi when referring to image resolution. Unfortunately, this is usually called DPI, a confusing misconception, which means DOTS PER INCH, a term used to describe the output resolution of printing devices.